Sweetheart Mini Wreath

…Spread the Love.

Hey Everyone!

Here is a great Valentine’s Day project…to make for yourself or as a gift for that special someone. Please let us know if you have any questions. This mini wreath was handmade with love by JoAnn Nehme, Please enjoy!

Please note that this project features mostly Sizzix products and supplies. We just love their stuff! All items used are listed below.

Image

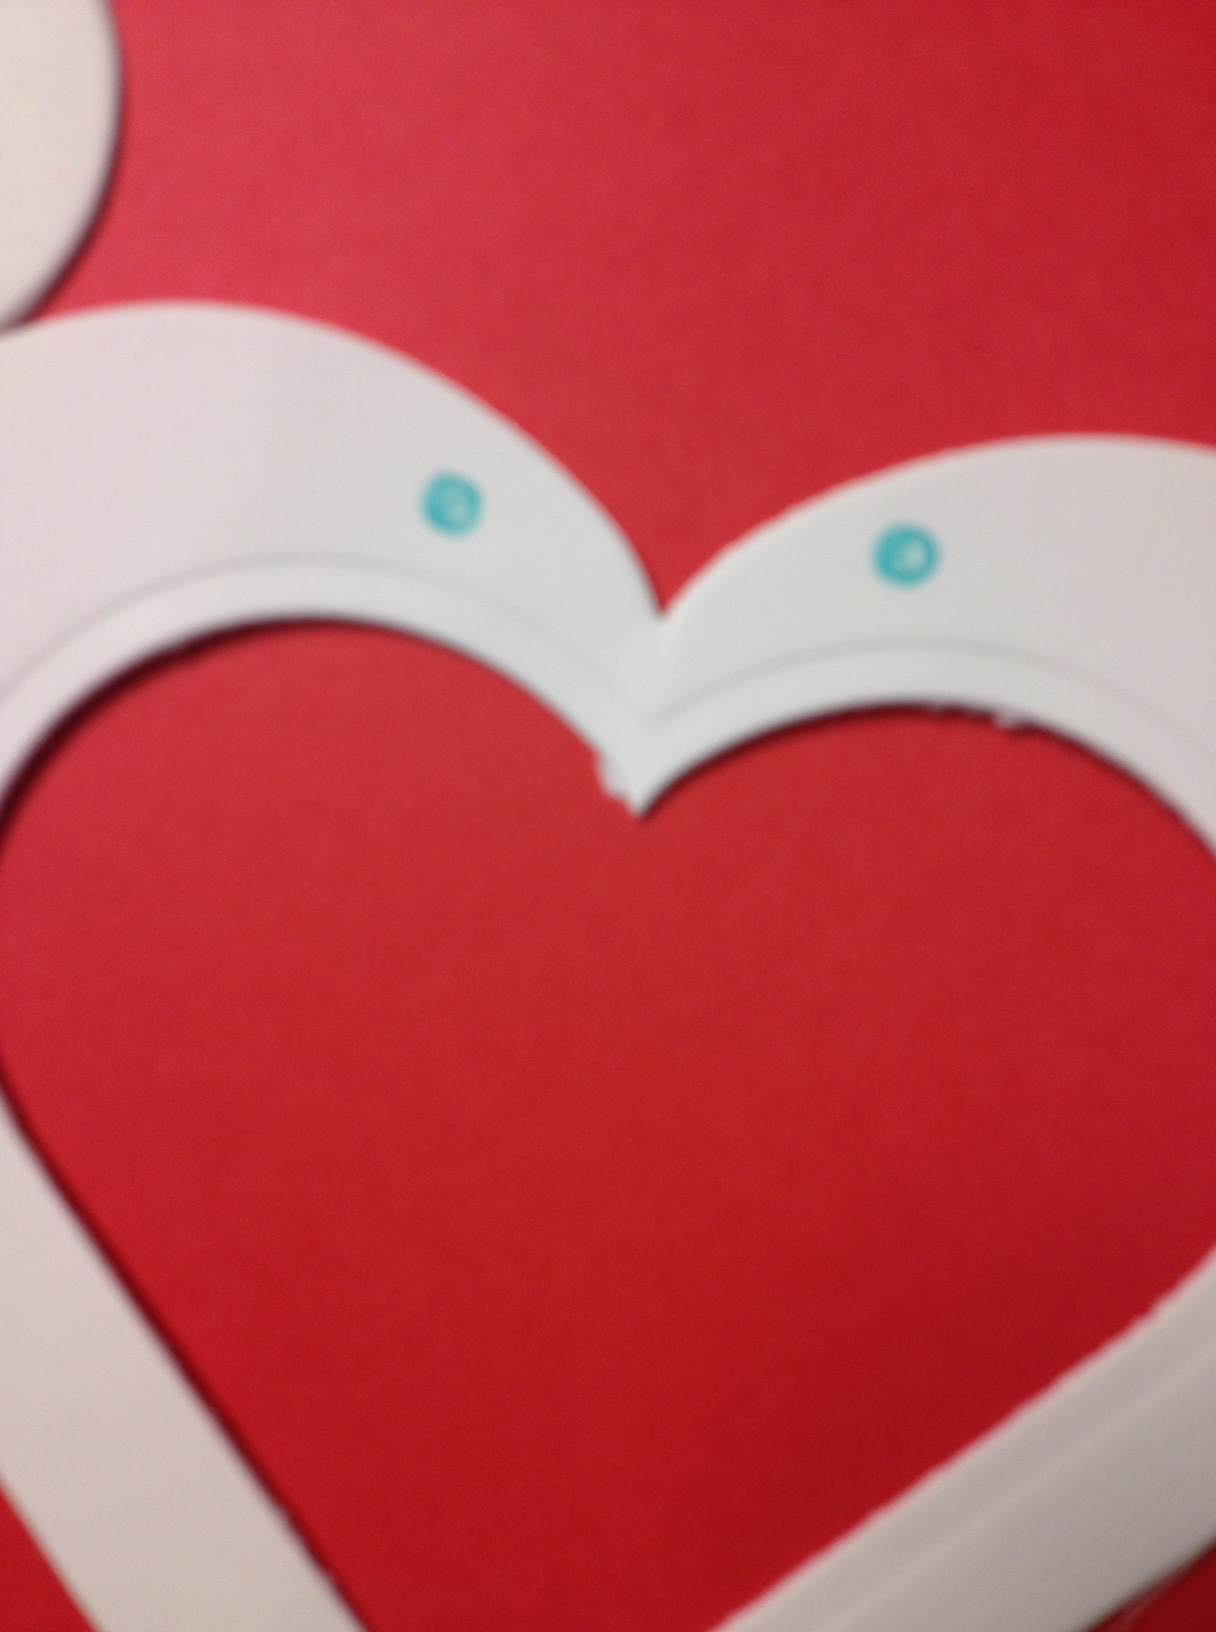
This mini wreath measures a tiny 5 3/8 inches.

You will need:

  • Sizzix Magnetic Platform
  • Sizzix Heart Framelits (6 Dies)-Featured here are the 5 3/8x 4 1/2 and the 3 1/2 x 3
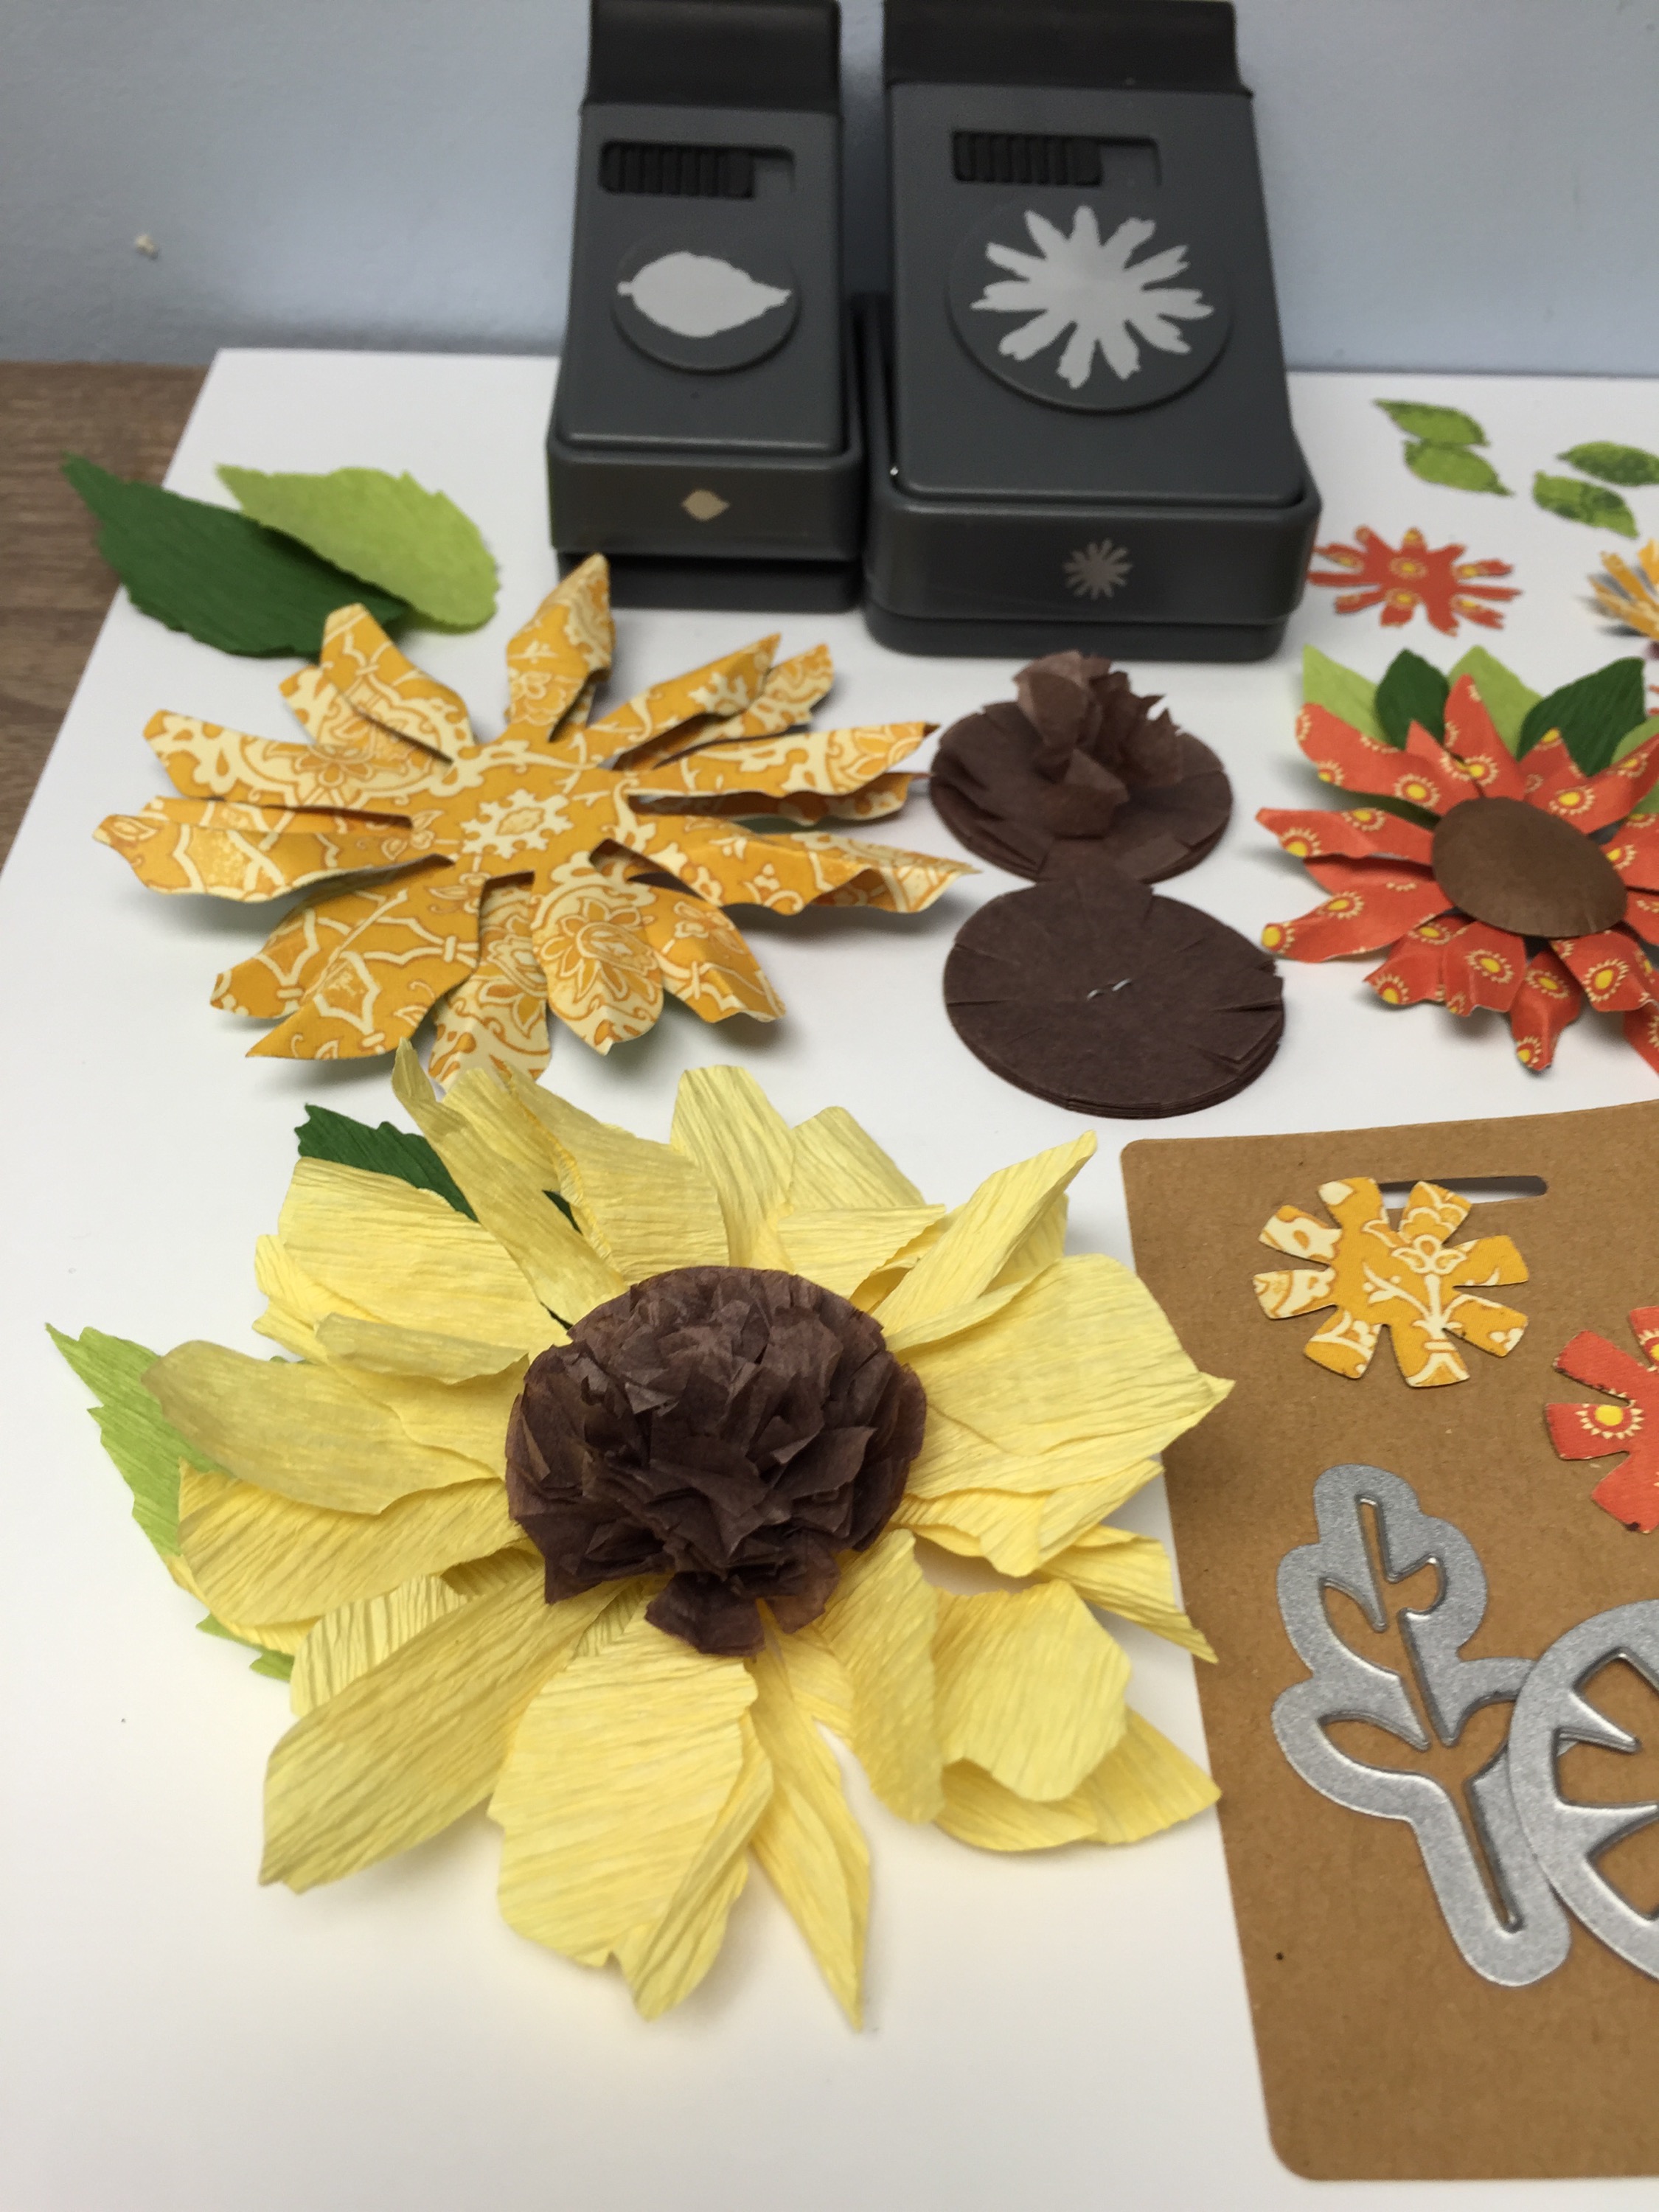
  • Sizzix Flowers 3-D
  • Sizzix Tim Holtz Tattered Flower Garland
  • And Extended Spacer Garland
  • White, Red, and Green Card Stock (or Scrapbooking paper)
  • Glue Stick
  • Ribbon 3/8 inch
  • Paper Hole Punch
  • Brads
  • Quilling Tool
  • Glue Gun

Directions:

To manke heart frame fold one sheet of paper (8.5x11in) in half and glue. Treat a second sheet of paper the same way. Then glue them together. You now have the thickness of four sheets of paper. Place your paper on the framelits and die cut, run it back and forth a couple times. You now have the base for your wreath.

Image

Image

Image

Image

Next:

Die cut the 5 3/8 inch heart to use as a template for your hole, fold in half and punch holes on the top. This makes them even on both sides. Place them over your heart and punch holes in your heart frame. Thread the ribbon through the holes and make a bow. Then slip ribbon through the back for the hanger. Tie a knot for your hanger.

Image

Image

Image

Image

Image

Now to make the flowers:

Die cut the smallest flower on the 3-D, use the quilling tool and roll up the flower and glue. To make the daisies, die cut 3 and 1 leaf assemble with brad. Glue the flowers to the wreath.

Hang and Enjoy!

These hearts would be beautiful for weddings and bridal showers as well! This is a great gift and fun project to make.

Enjoy, and as always Happy Crafting!

Pair of Petals

***This is a distressed version of the same wreath! Also adorable.

Image

Patriotic Pocket! Recycled & Upcyceld

Hi Everyone!

I hope that you are enjoying a nice long weekend, and celebrating the many brave men and women who have fought for our country and mad the ultimate sacrifice. “Home of the free, because of the Brave”…

And, with all that extra free time you were able to gather this weekend…here is an excellent project to make & show your red, white, and blue spirit! This was simply made from an old pair of mens jeans, but just the pocket and a little extra fabric is needed–(make sure they are old, and not currently in use! haha)

The directions are below on how to create this beauty…

I just think this projects is great as a little decoration all summer long.  I could also see it used on your party table, or as an accent piece throughout the summer! Either way, we hope you enjoy this fabulous little project, please feel free to ask questions and enjoy.

It’s hot out there already, stay cool!

And as always, Happy Crafting!

Pair of Petals

Craft by JoAnn Nehme

Supplies Needed For Patriotic Pocket:  (Of course this can be varied to create the look you desire, but this is how I made mine)

  • Pair of old Jeans-remove pocket/Men’s if you want a slightly larger end product
  • Yard stick or wooden dowel
  • String  for a hanger
  • Clip art Flag
  • Doily
  • Sizzix Eileen Hull  flower layers with heart and leaves die cut
  • Die cut  leftover denim from jeans to make denim flower
  • I used the scalloped circle on Sizzix Eileen Hull’s cookie box  die cut
  • Run a stitch around the circle and pull and gather  (if you have a yo yo sew a button on)
  • Star die cut or punch
  • Tim holtz  stitch thinlit
  • Tim holtz stamps stampers anonymous /Tim holtz  ranger distress ink
  • Beacon adhesives glue

Cut out pocket  leavening a little fabric on top of pocket so you can fold over fabric on to your stick or dowel.  You can use double side sticky tape or a running stitch with embroidery floss or glue how ever you want to attach your pocket to the twig or stick.. Then just add and glue what ever you like flag, clipart, and flowers. Tie a string hanger  on you stick  and your done. Hang and enjoy.  I hope you like this project it’s super easy and fun .. Happy crafting ..

This was made with Sizzix Eileen Hull’s block die cut covered with burlap and patriotic clip art. 


Clip art from bonfiresandwine.com

Pretty Paper Flowers (Just in time for V day)

Hello Everyone,

It’s almost February and you know what that means! Valentine’s Day. Well, just in time to celebrate here are a few projects to get you in the mood…

First off here is a project handmade by JoAnn Nehme.  I just love the use of text mixed with the elegance of the flower…it really makes this project something special. This flower would be beautiful on a gift, or as a decoration. If you are interested in making your own, the directions are below! Please let us know if you have any questions.  

This flower was made using:

*Sizzix Eileen hull  flower layers with heart       *Die cut Brenda Walton  vintage leaves  and bird     *Die cut Scrapbooking  paper from Michaels  *White bazill  and brown craft paper or recycled brown bags     *Rangers Tim holtz  distress gathered twigs   and    *Black archival  ink                                     *Hero art rubber stamp with text                   *Clip art  post card  from the graphic fairy or on my Pinterest board clip art                        *Melissa Frances hanger                                      *Seam binding ribbon  


 Die cut flower and stamp with text  


Glue flowers together and cut bottoms of roll petals with a pencil to shape. Distress with ink . Glue together and stack . I used crafters pick glue . You could also use a glue gun…Attach stamped and distress  die cut leaves . 


Next up is a few fantastic paper flowers…  

I made these with pink and red card stock …they are perfect for Valentine’s Day . I used white picket fence paint and diamond dust    Diamond dust you can get at Michaels .. 

 The project above I made with Eileen’s Brenda’s and Tim ‘s flower dies .  

Below you have crepe paper flowers crepe paper from paper mart  and Sizzix Eileen hull ‘s flower die cuts . Ribbon and scrapbooking paper glitter and glue from Michaels . 

Happy Valentone’s Day! We hope you enjoyed these festive projects!

 As always happy crafting !!

Nevermore Halloween Tag

Hello Everyone!

Halloween is quickly approaching…yay! Here’s a is a cool tag handmade by JoAnn Nehme, @sage2352! This tag is sure to be a real treat at your Ghoulish gatherings, and Halloween happenings! I just love the fall colors mixed with the raven. 

This tag was made using:                                                                    Ranger distress ink                                                           Sizzix Tim holtz Raven and tag Die cut                   Rubber stamps                                                                   Manilla card stock  

 Halloween paint stick frame .                                        Sizzix Tim holtz die cuts                                                  Ranger distress ink                                                             Card stock  

 We hope you enjoy this project as much as we do! Questions? Please ask!

Happy Crafting!

Pair of Petals

Pink October 

Hello Friends!

Hope everyone is enjoying the crisp cool weather that is now here. Happy Fall! 

We just wanted to take a moment to remind you all that October is Breast Cancer Awarness Month! So, get checked…and do your checking…🌸

Think Pink! And show your support and love with one of these fun crafts below created by JoAnn Nehme…@sage2352. 

Have a happy and healthy autumn! As always please let us know if you have any questions!

Craft On,

Pair of Petals

*To make the flowers I used sizzix Tim Holtz tattered florals  pink white and black scrapbooking paper- Clip art  from goggle -and rubber stamps for words. 
 

Fall for Sunflowers (as if you don’t love them already)

Hey Everyone!

We hope you are all enjoying the last hoo-rah of summer! It’s a gorgeous night here in the Hudson Valley. I plan on soaking up every last bit of summer while its still here. Buuuuuuut, Fall is just around the corner…and for those of you who want get a head start on Fall home decor; here is another great project from JoAnn Nehme @sage2352 on Instagram.

We hope you enjoy the rest of your summer and more even more beautiful Fall days ahead.

If you have any questions please ask!

As always…Happy, Happy, Crafting!

Pair of Petals

The frame for this project was made using paint sticks from the hardware store. If you ask they will always happily give you a ton. They come in handy for lots of great projects!

Have any ideas for paint sticks? We would love to hear them!

Here is what you will need to complete this look…but always remember you can customize your frame in anyway, that’s what makes this project to fun and versatile.

So here’s what you’ll need:

  • Sizzix Stephanie Barnard pennant die cut
  •  Eileen Hull travel tag ,leaves, Fringe flower die cut and flower thinlits
  • Tim Holtz tattered florals jumbo and tattered florals die cut, alphabet die cut,  Bird silhouette die cut, alphabet block talk lower case
  •  Flower and leaf paper punch
  • Sentiments set shadow press debossing happy and shadow press station  ranger brayer
  • Distress inks and black archival ink
  • Bazzill  paper
  • cordinations paper
  • Graphic 45 paper
  • Glue stick
  • Tim holtz stapler
  • Chip board for the bird and black deco art Americana paint
  • Brown tissue paper and green crepe paper
  • mini clothespins -Paper mart

Sunflowers  

                                                         Sun flower garland mantel decor…

This garland was made for a friends bridal shower…and it looked absolutely beautiful. This could be used for any number of celebrations.

Dreamy Dreamcatcher

Hello Friends!

Here’s another great do-it-yourself project handmade by JoAnn Nehme! I just love this project. These are so beautiful and can be customized to any color scheme you can dream up. Easy to make, pretty to look at, great as a gift. Now that’s what I’m talking about…

Have a question? Ask us! We love feedback.

Here’s what to do next (run to the store and buy these supplies, or dig through your craft room and find some cool left over scrappy materials!)

Dream catcher supplies needed:

*5in embroidery hoop

*Sizzix Eileen Hull doily die cut or Tim Holtz doily embossing folder – These can also be made using a store bought doily.

*Jute, twine , ribbon and yarn of choice to wrap hoop

* I used a doily die cut on white Bazzill paper…You can also use Water color paper or scrapbooking paper Tim holtz distress stains and distress ink..

*Embellishment die cuts  – Sizzix Eileen Hull – Flower layers with heart leaves and new flower thinlets.

* Tim holtz feather and hearts die cut and rubber stamp Dream.

*Embellishments of choice  beads  feather Leaves hearts etc.

Directions:

1. Wrap embroidery hoop


2. Weave on doily and adjust as weaving on doily to make it centered.  I use a yarn needle for this. End with yarn in the back for a hanger…

  
3. Next loop on your ribbon or yarn for your fringe on your Dreamcatcher add beads leaves flowers of your choice … I die cut leather with Eileen’s doily die cut I have used this die many many times and it still cuts perfectly…

 Some of the Dreamcatchers I made .. So much fun for all ages..

  
  Oooooooooh Ahhhhhhhhhhhhh 🙂

 These make great gifts or are fun as a group activity …

We hope you love this project as much as we do.

Happy Crafting,

Pair of Petals

Wally. We allllll love Wally.

Hello Friends!

So, anyone that knows me…knows that I looooooooove sweet bunny wunnies. I really do.  I guess I never realized how much I loved them until I came across Wally. He’s become a bit of an Internet sensation. People love him, and so do I.  

My husband actually said to me the other day “if you saw that bunny hopping down the road, you’d follow it to wherever it was going”…

I have to admit, he’s 100% correct. I’d end up in the middle of the woods, lost, but with a couple really sweet photos of the rabbit next to a field of flowers. Who knew. 

Anyway, so instead of chasing this bunny down I decided I should just draw him.  He’s cute, and paintable, and that will make me happy. So here he is. Wally. 

Be sure to follow him on Instagram. He’s amazing.  I don’t want to steal photos without permission so just take my word for it and go look at him. And in the meantime…here are my watercolor illustrations and drawings! 

@Wally_And_Molly    

Check out more of my art also by clicking here:   Michelle’s Art  

Happy Crafting!

Michelle@ Pair of Petals


Spring & Summer Floral Wreath

Hello Fans!

We were just going through some of recent projects and wanted to share this wreath again!

The beautiful weather is here, flowers are blooming…what better time to be in the spirit to make something special for your home!

We are also submitting this to this weeks Monday challenge on Simon Says Stamp Challenge: For The Love Of Plants!

Because, yes! We love plants. And if you do too, you can check out their site and post your projects too.

http://www.simonsaysstampblog.com/mondaychallenge/

Happy Crafting,

Pair of Petals

Pair Of Petals

Hi Everyone!

Wow! I just can’t get over this absolutely stunning wreath that was handmade by my mom JoAnn Nehme. Each flower is handmade and absolutely beautiful.

This is the perfect wreath to welcome sunshine and flowers in to your home. I just love it, truly a work of art.

You can find her on Instagram @sage2352.

This was made using:

  • Grapevine wreath
  • Sizzix Eileen hull’s flower w/layers-heart die cut

Check out Eileen’s Blog!

http://www.eileenhull.com

  • For the Peach white and yellow flowers Flower 3d fringed pink flowers Flower 3d#2
  • the little orange flowers leaves Tim holtz Garden greens die cut
  • Leaves die cut
  • Memory box Fern die cut
  • Crepe paper tissue paper from papermart
  • Susan Tierney Cockburn tools
  • Ribbon redleadpaperworks.com
  • Tim holtz distress ink
  • Green and white bazzill scrapbooking paper

If you have any questions please ask! We love your feedback!

Happy Spring, Happy Crafting!

Pair of Petals

View original post

Lovely Luggage Tags!

Hello Everyone!

It’s warm (kinda!) and summer is almost here! That means it’s time to travel! Yay! With school ending and summer vacations upon us, this luggage tag is just the perfect addition to your travel bags. These would also make a great gift to anyone taking a trip, or a teacher on the last day of school.  I love how personal you can make them. The options are endless! Stop by and check out Eileen Hull’s blog, for all the latest projects and fantastic new die cute, especially her new travel collection! You can even enter your projects for a chance to win fun prizes.

This project was handmade by JoAnn Nehme…you can find her on Instagram @sage2352.

These were made using:

  • Sizzix Eileen Hull’s new luggage  tag die cut
  • Flower layers w/heart die cut
  •  Bazzill white card stock
  •  Aleene’s  tacky glue
  •  Fabric , burlap , maps , recycled denim
  • Ribbon and assorted embellishments
  • Brads and buttons of choice.
  • Sheet of clear plastic
  • Index cards
  • Sewing  machine.

Step 1. Spray glue card stock and layer over fabric and die cut..

 Step 2. Cut clear plastic to fit tag. Place in side tag and sew around or glue .

Step 3. Cut index card to size and place inside add ribbon and embellishments of choice ..

Step 4. Attach a ribbon as a lanyard to finish off the tag.

Step 5.

Enjoy your fancy new luggage tag that is sure to keep everyone at the luggage claim from stealing your super cool, one of a kind travel bag!


We hope you love this project as much as we do.

I know I will be traveling this summer with my stylish new luggage tags and I can’t wait!

May you all have happy and safe summer vacation!

Happy Travels and Crafting! ✈️☀️🌴

Pair of Petals